Macro Keyboard Using Arduino to control PC/Mac Softwares & Games | DIY stream deck | AutoHotKey8 min read
Reading Time: 5 minutesIntroduction
If you are someone who works on computers a lot, be it for playing games, preparing your college presentations, designing logos for clients, or for programming, efficiency is called for! Now, for a computer geek like yourself, you have eased into your work with a few clicks of a button – keyboard shortcuts. I mean, they do help you to boost your productivity, ameliorate the efficiency of your work, and helps to complete the task at hand faster. However, more often than not, you would find yourself in a fix because some games and applications might not even have keyboard shortcuts while other easy tasks, like opening Spotify, Skype, VS Code, might not be achieved by keyboard shortcuts.
What does it leave us with! An attempt at convenience.
In this quick tutorial, I’ll show you how you can do everything mentioned above and more with single button presses! You don’t even need extensive knowledge of Arduino or programming to follow along with this tutorial.
Things You’ll Need:
You can buy each of these products from the links above.
Video Tutorial
All the steps are covered in detail with graphics for better explanation in the video. But if your are more of a reader than a watcher then let’s continue with the article.
Macro Keyboard Using Arduino
Step 1: Arduino Sketch and Hardware Assembly
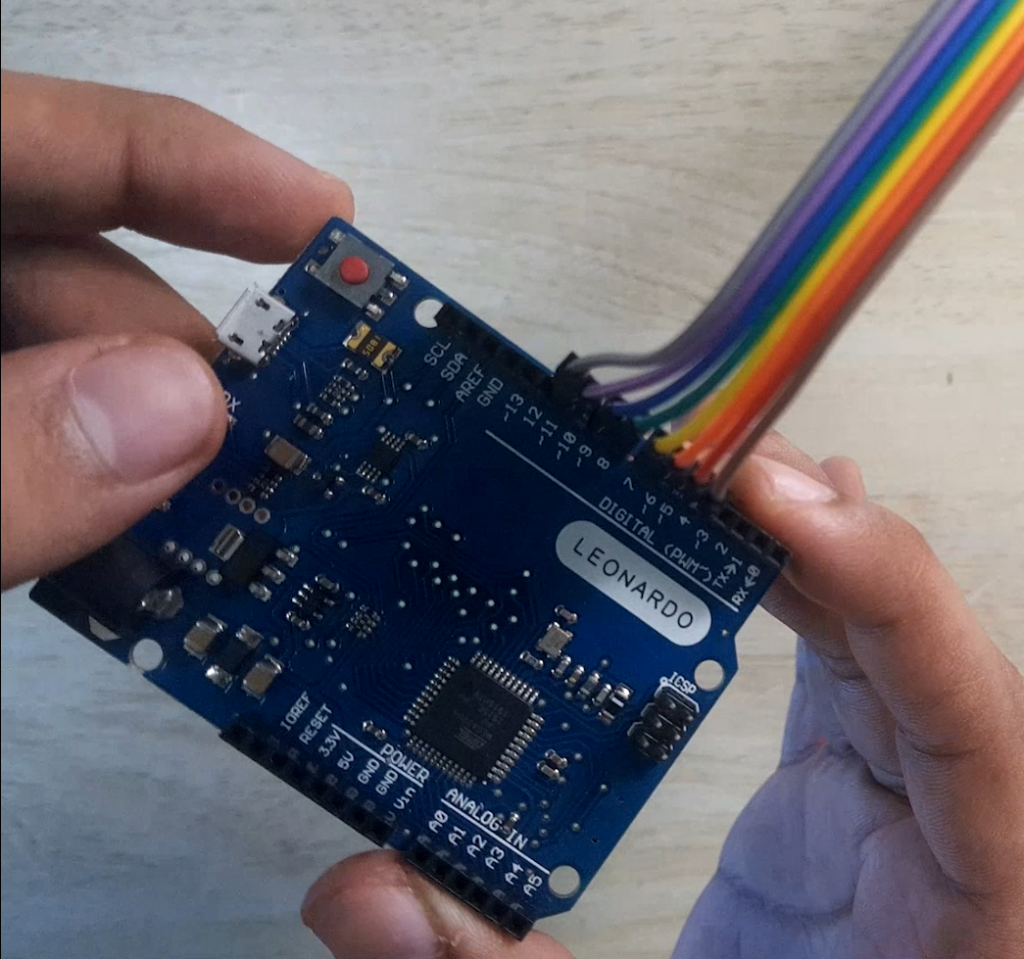
- Firstly, we’ll connect the Arduino with the keypad using Jumper cables. I have used pins from d4 to d11 to connect the keypad to the Arduino.

- Next, Connect the Arduino IDE to the PC and also Download the Arduino IDE.
- In the Arduino IDE, Goto Tools > Port and make sure an appropriate port is selected. In my case it was COM11. Next, Goto Tools > Board and select the type of Arduino board that you have, in my case it was Arduino Leonardo.
- Goto Sketch > Include library > Manage libraries. In the window that opens up, search for ‘HID-Project’ and install the HID-project library by Nicohood. Also, search and install the ‘Keypad’ library by Mark Stanley.
- Next, open this link to open the GitHub page of this project and copy the code from there to the Arduino IDE.
- In the code, the following lines define the digital pins of Arduino that we are using. As I’m using the pins from d4 to d11, I have mentioned the same in the code as well. You can change this code according to the digital pins that you are using.
In the code, you will notice that their is a switch statement containg cases for each key of the keypad. We can program what we want each specific key to do in the case of that key.
Step 2: Programming the Keys
Control Music – Play/Pause the song, Play next/previous song:
Let’s program key A of our keypad to Play/Pause the music, the key B to play the next song in the playlist, and the key c to play the previous song!
- Goto Case “A” of the switch case and there delete the Keyboard.println statement and write the following line of code instead:
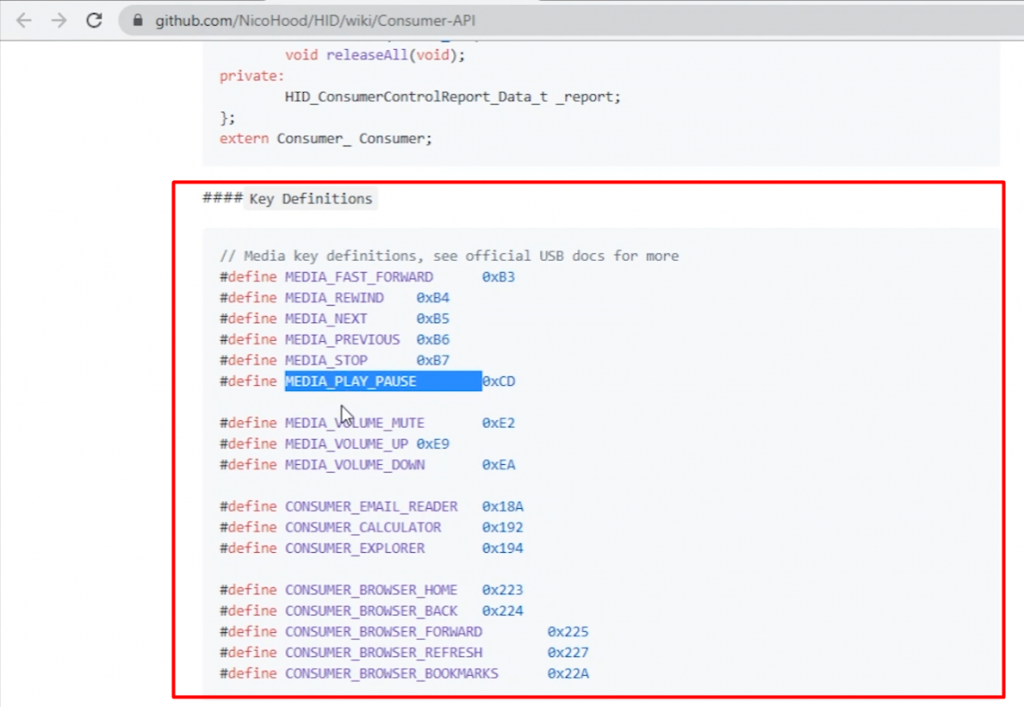
Consumer.write(MEDIA_PLAY_PAUSE);Here, we have used the write method from the NicoHood library and have used the MEDIA_PLAY_PAUSE constant to play/pause the music.
You can find the list of all of these contants from the NicoHood library documentation

- Similarly for Case “B” and Case “C”, we can use Consumer.write(MEDIA_NEXT); and Consumer.write(MEDIA_PREVIOUS); respectively.
You can compile and upload this code to arduino to test it out. Key A should play/pause the music, Key B should play the next song and Key C should play the previous song.
Control Games like Counter Strike and GTA ViceCity
Lets program the Key 1 of the keypad to increase our health to 100% in GTA ViceCity and the Key 2 to add a gun and grenade in our loadout in Counter Strike.
As many of you might know the cheatcode to increase the health to 100% in GTA ViceCity is “Aspirine”, so in our code as well, we will write “Aspirine” one character at a time.
Also, in Counter Strike, you can press the key combination of “b4464” on your computer keyboard to add a gun and a grenade in your loadout. So for this as well, we will print “b4464” one character at a time.
- Goto Case “1” and type the following code to print “Asprine” one character at a time for GTA ViceCity health cheat
case: "1":
   Keyboard.write("a");
   Keyboard.write("a");
   Keyboard.write("a");
   Keyboard.write("a");
   Keyboard.write("a");
   Keyboard.write("a");
   Keyboard.write("a");
   Keyboard.write("a");
break;- Goto Case “2” in the code and type the following code for Counter Strike:
case: "2":
   Keyboard.write("b");
   Keyboard.write("4");
   Keyboard.write("4");
   Keyboard.write("6");
   Keyboard.write("4");
   break;
Step 3: AutoHotKey
What we did till now were some simple use cases, that only required us to press a few keyboard key combinations. What if I want to do something a bit more complicated like open an app, like skype in a similar way with a press of a button. With our current setup, we cannot do that directly, because using our Arduino we can just emulate a keyboard and send some keyboard keystrokes to our PC. We cannot send instructions like start an application to our PC using an Arduino.
To achieve that we will use a program called AutoHotKeys.
Autohotkeys lets us trigger a set of commands or actions if and when some keyboard shortcuts are pressed. For example, currently I have setup autohotkeys in such a way that when I press windows + alt + n, it opens Notepad. So you can see how we can use this to our advantage.
Alright so let’s see an example of an AutoHotKey script to Open notepad when key combination Windows + n is pressed:
#n::
Run Notepad
return
Here the line “Run Notepad” will actually open notepad and it will be triggered when Windows + n is pressed. The line “#n” denotes Windows + N.
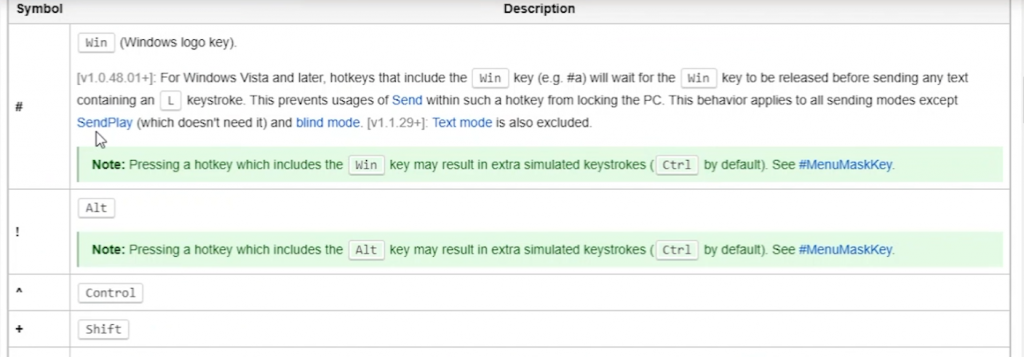
Here # is a modifier for the Windows key. You can find the list of all the available AutoHotKey modifiers in this documentation.

Here in the documentation, you can see that the # key stands for Windows key, the ! (exclamation) key stands for Alt and so on.
The code below is a simple AutoHotKey script to open Notepad when Windows + Alt + N is pressed and it also opens the website codeometry on Google Chrome when Window + Alt + C is pressed.
#!n::
Run Notepad
return

#!c::
Run chrome.exe https://codeometry.in
return
You can copy and paste this code in any text editor and save it with any name and with the extention of .ahk
Once the file is saved, run that file with Admin privileges.
Now when you press Windows + Alt + n, it should open notepad on your PC. When you press Windows + Alt + c, it should open codeometry in google chrome.
So now, let configure our Arduino keypad to send Windows + Alt + n and Windows + Alt + C when keypad key 3 and key 4 are pressed respectively.
In our Arduino script, goto case “3” and type in the following code:
case "3":
   Keyboard.press(KEY_LEFT_GUI);
   Keyboard.press(KEY_LEFT_ALT);
   Keyboard.press('n');
   break;
Here, we have used the press method of the Arduino Keyboard library. The KEY_LEFT_GUI constant stands for the left windows key. You can find all the available key definition constants on the keyboard library.
Similarly for case “4”, lets send Windows + Alt + c using the code below:
case "4":
   Keyboard.press(KEY_LEFT_GUI);
   Keyboard.press(KEY_LEFT_ALT);
   Keyboard.press('c');
   break;
Now you can upload this code and test it out. On the keypad, when you press the key 3, Notepad should open on the PC and simialarly Key 4 should open codeometry in chrome.

![DIY Control PC Volume, Photoshop, Lightroom, Premiere Pro & more using Arduino and Rotary Encoder [Volume knob] DIY Control PC Volume Photoshop Lightroom Premiere Pro Using Arduino Encoder Volume knob 1 - DIY Control PC Volume, Photoshop, Lightroom, Premiere Pro & more using Arduino and Rotary Encoder [Volume knob]](https://codeometry.in/wp-content/uploads/2021/02/DIY-Control-PC-Volume-Photoshop-Lightroom-Premiere-Pro-Using-Arduino-Encoder-Volume-knob-1.png)
